OpenAEV installation demystified: your ultimate guide


Romuald Lemesle
Software Engineering Manager - OpenAEV
-
 Copied!
 -
Copied!
-
Copied!


OpenAEV (Open Adversarial Exposure Validation), is a powerful platform designed to evaluate and enhance an organization’s Security Posture by simulating real-world cyberattacks. Built on a modular architecture, OpenAEV seamlessly integrates various components and dependencies, providing flexibility and scalability.
OpenAEV is part of the eXtended Threat Management (XTM) suite and can leverage its built-in integration with OpenCTI to use qualified Cyber Threat Intelligence (CTI) and enhance your Adversarial Exposure Validation program. This integration allows organizations to leverage threat intelligence in their attack simulations, making security testing more dynamic and aligned with real-world threats.
This article is intended for individuals looking to install OpenAEV. A minimum level of technical knowledge is recommended:
- Docker: for quick deployment using containerization.
- Java/Spring: for manual installation and a deeper understanding of OpenAEV’s internal components.
This article is based on the OpenAEV 1.12.2 release. The versions of dependencies and the environment variables/application properties may vary depending on the version you intend to deploy.
OpenAEV Technical Architecture
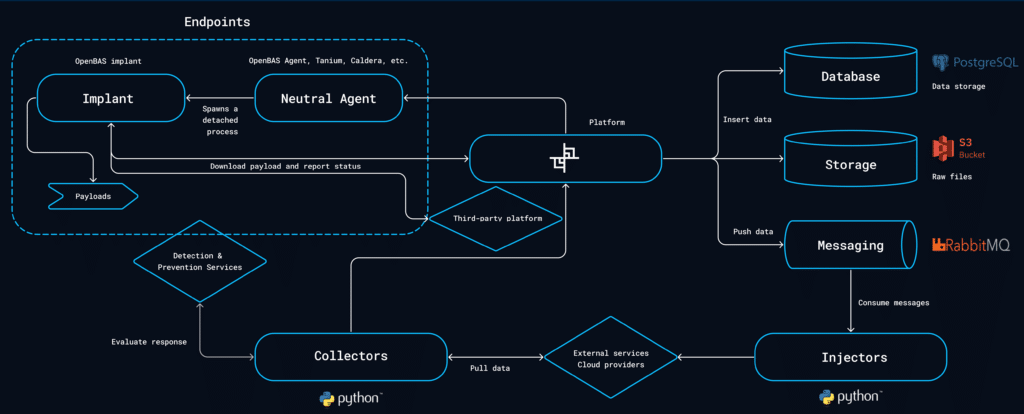
The OpenAEV platform is structured around the following key components:
Core Platform
The heart of OpenAEV, featuring business logic, a Java/Spring-based API, and a React-based user interface. It also includes built-in injectors and integrations with third-party agents.
OpenAEV Agent & Implant
Developed in Rust, these components execute technical injectors on targeted assets:
- Agent: Registers an asset on the OpenAEV platform and retrieves jobs to be executed. The Agent will not perform direct attack to remain neutral for antivirus and ensure attack scenario continuity.
- Implant: Executes jobs received from the Agent. The implant performs direct attacks and may be detected and terminated by antivirus software.
Injectors
External modules that extend the platform’s capabilities by adding different types of injects to customize attack scenarios, simulations, and atomic testings. These injectors can function independently or interact with third-party services.
You can create your own injector by cloning an existing one. Filigran team maintains a python library to allow you accelerate your developments.
Collectors
Python modules that pull data from various external services for two purposes:
- Integrate with security systems like SIEM, EDR, and XDR to verify if a technical inject was detected or prevented, thus offering critical insights into an organization’s security posture.
- Collect any data that may help to schedule breach and attack simulations such as list of assets, groups, identities, payloads, etc.
Dependencies
OpenAEV relies on several external components:
- PostgreSQL (17): Serves as the primary database for storing core platform data.
- RabbitMQ (4): Manages messaging between Python injectors and OpenAEV, enabling asynchronous communication.
- MinIO (>= RELEASE.2024): Handles object storage, including image management.
- Elasticsearch (8.x): Supports indexing and retrieval of platform data, and can be used alongside Kibana for enhanced observability.
Deployment & Configuration Guide
Deploying OpenAEV with Docker
Prerequisites
Before installing OpenAEV, ensure that Docker Compose is installed on your system. Here’s how to install it:
For Linux
- Set up Docker’s repository based on the official documentation:
Example on Ubuntu 24.04
 sudo apt-get update
sudo apt-get install docker-compose-plugin2. Verify the installation:
docker compose versionFor Windows & macOS
- Download Docker Desktop from the official website.
- Follow the installation instructions provided on the website.
Installing OpenAEV
- Clone the OpenAEV Docker repository:
2. Configure the environment:
By default, the docker-compose.yml file utilizes environment variables specified in the .env.sample file. You can make a copy of.env.sample to .env and populate the necessary values to reflect your configuration.
OpenAEV provides official Docker images available here: OpenAEV Docker Hub.
One of the key strengths of this platform is its modular architecture, allowing you to deploy multiple Docker images to best fit your specific needs and use cases. Whether you’re setting up a lightweight development environment or a full-fledged production system, the flexibility of Docker ensures seamless adaptability.
In-depth exploration of the Docker Compose file
We will go through the docker-compose.yml and .env file together to understand its structure, allowing you to modify the variables according to your needs.
⚠️ Important: The
.envfile provided is an example configuration. For security reasons, be sure to update your credentials before deploying to prevent unauthorized access.
1. Dependencies
PostgreSQL
docker-compose.yml
# PostgreSQL Configuration
POSTGRES_USER=postgres
POSTGRES_PASSWORD=admin
.env
MinIO
  minio:
    image: minio/minio:RELEASE.2024-05-28T17-19-04Z
    volumes:
      - s3data:/data
    ports:
      - "9000:9000"
    environment:
      MINIO_ROOT_USER: ${MINIO_ROOT_USER}
      MINIO_ROOT_PASSWORD: ${MINIO_ROOT_PASSWORD}
    command: server /data
    restart: always
    healthcheck:
      test: [ "CMD", "curl", "-f", "http://localhost:9000/minio/health/live" ]
      interval: 10s
      timeout: 5s
      retries: 5
docker-compose.yml
# MinIO Configuration
MINIO_ROOT_USER=minioadmin
MINIO_ROOT_PASSWORD=minioadmin
.env
RabbitMQ
  rabbitmq:
    image: rabbitmq:3.13-management
    environment:
      - RABBITMQ_DEFAULT_USER=${RABBITMQ_DEFAULT_USER}
      - RABBITMQ_DEFAULT_PASS=${RABBITMQ_DEFAULT_PASS}
      - RABBITMQ_NODENAME=rabbit01@localhost
    volumes:
      - amqpdata:/var/lib/rabbitmq
    restart: always
    healthcheck:
      test: [ "CMD", "rabbitmq-diagnostics", "-q", "ping" ]
      interval: 10s
      timeout: 5s
      retries: 5
docker-compose.yml
# RabbitMQ Configuration
RABBITMQ_DEFAULT_USER=rabbitadmin
RABBITMQ_DEFAULT_PASS=rabbitadmin
.env
Elasticsearch
  elasticsearch:
    image: docker.elastic.co/elasticsearch/elasticsearch:8.17.4
    volumes:
      - esdata:/usr/share/elasticsearch/data
    environment:
      # Comment-out the line below for a cluster of multiple nodes
      - discovery.type=single-node
      # Uncomment the line below below for a cluster of multiple nodes
      # - cluster.name=docker-cluster
      - xpack.ml.enabled=false
      - xpack.security.enabled=false
      - thread_pool.search.queue_size=5000
      - logger.org.elasticsearch.discovery="ERROR"
      - "ES_JAVA_OPTS=-Xms${ELASTIC_MEMORY_SIZE} -Xmx${ELASTIC_MEMORY_SIZE}"
    restart: always
    ulimits:
      memlock:
        soft: -1
        hard: -1
      nofile:
        soft: 65536
        hard: 65536
    healthcheck:
      test: curl -s http://elasticsearch:9200 >/dev/null || exit 1
      interval: 30s
      timeout: 10s
      retries: 50
docker-compose.yml
# ElasticSearch Configuration
ELASTIC_MEMORY_SIZE=4G
.env
2. OpenAEV platform
docker-compose.yml
.env
3. Customize
You can add several modules depending on your usage. You can find what is available here → OpenAEV Ecosystem
docker-compose.yml
COLLECTOR_MITRE_ATTACK_ID=00000000-0000-0000-0000-000000000000 # Should be a valid UUID.env
Running OpenAEV
Once configured, launch OpenAEV using Docker Compose:
sudo systemctl start docker.service
sudo docker compose up -d
Accessing OpenAEV
Once installed, you can access OpenAEV via your web browser:
http://localhost:8080Login using the admin credentials defined in your .env file.
Deploying OpenAEV manually
Dependencies
Before deploying OpenAEV, ensure the following dependencies are installed:
- PostgreSQL: PostgreSQL Documentation
- RabbitMQ: RabbitMQ Documentation
- MinIO: MinIO Official Site
- ElasticSearch: ElasticSearch Official Site
- Java: Java Documentation
You can use the docker-compose.yml file available in the openaev-dev directory.
Installing OpenAEV Manually
- Download and extract the latest release:
⚠️ Example with release 1.12.2, please change the release version based on your needs.
2. Configure the application:
Modify the application.properties file (found at the root of the extracted release archive) to meet your requirements.
For a complete list of configurable parameters, visit: OpenAEV Configuration Guide.
In-depth exploration of the application.properties file
We will go through the application.properties file together to understand its structure, allowing you to modify the variables according to your needs.
1. Dependencies
PostgreSQL
MinIO
# MinIO Configuration
minio.port=10000
minio.access-key=minioadmin
minio.access-secret=minioadmin
RabbitMQ
ElasticSearch
2. OpenAEV platform
Running OpenAEV
Ensure all dependencies are running and healthy before executing the following command:
Accessing OpenAEV
Once installed, you can access OpenAEV via your web browser:
http://localhost:8080Login using the admin credentials defined in your application.properties file.
Deploy OpenAEV Agent
This section contains useful information for conducting technical attacks through assets. If you’re using OpenAEV for tabletop scenarios or simulations, you can skip this.
If you are using OpenAEV to conduct attack simulations on technical assets, you need to deploy an agent on the targeted asset.
OpenAEV offers integration with several existing agents, including CrowdStrike, Tanium, and Caldera. However, we also provide our own in-house agent, and we will walk through the deployment process for it.
For other agents, you can find more details in the official documentation.
Depending on the OS, several installations are at your disposal, you can find them on OpenAEV by clicking the blue icon on the right top corner :
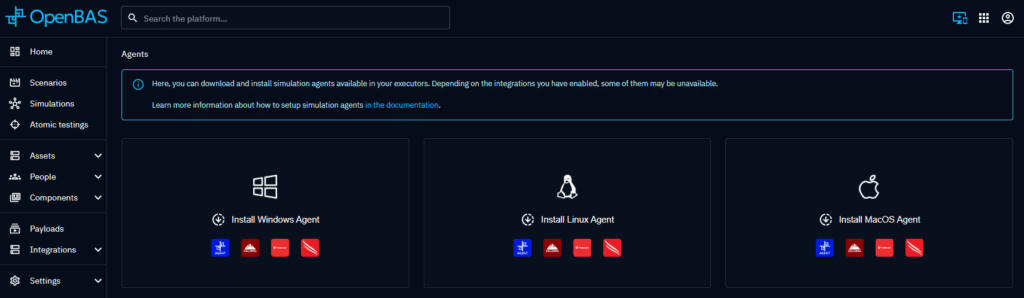
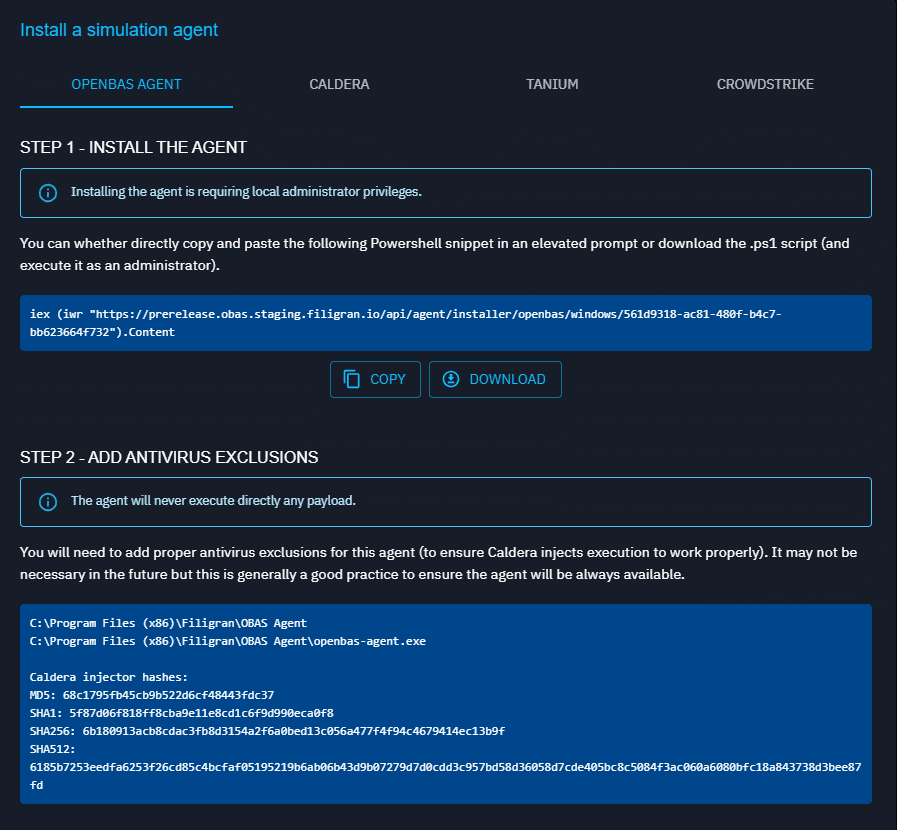
After choosing your OS, just follow the instructions provided by the OpenAEV platform:
- Copy the snippet
- Add antivirus exclusions
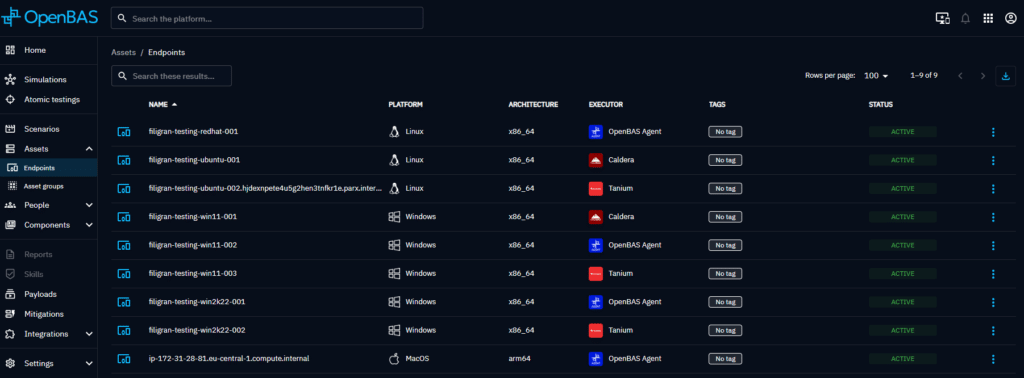
Once the agent is deployed, you will retrieve your registered endpoints in the dedicated list and used it in your technical injects.
Conclusion
OpenAEV enables organizations to proactively assess their cybersecurity resilience through sophisticated breach and attack simulations. Its modular architecture, diverse integration capabilities, and ease of deployment make it a solution for security professionals aiming to strengthen their defense strategies.
Whether you opt for Docker-based deployment or a manual setup, OpenAEV provides the flexibility to adapt to your unique security needs.
Ready to get started? Explore the full documentation at OpenAEV Docs.
Curious to learn more about OpenAEV’s core functionalities and how they can bolster your Continuous Threat Exposure Management (CTEM) program? Check out this in-depth article!
Read more
Explore related topics and insights


